Learn to use Form based authentication in Java EE 7 with, Wildfly 8 and Mysql database. This is a kind of JAAS authentication provided in Java EE applications to ease the developer work.
Tools Used: Eclipse JavaEE – Juno, Wildfly 8.1.0, MYSQL
In this Tutorial we will be creating an Authentication and authorization module for JavaEE application. We will be doing FORM based authentication. Following is Index for the series up to now.
Series Index:
- MySql Datasource creation in Wildfly 8
- Project structure Eclipse+Wildfly+MySql+JPA+EJB+JSF+RS
- Creating Entity using JPA+Hibernate
- Creating EJB to do CRUD on Entity
- Creating View in JSF+Managed Bean
- Applying Bootstrap to JSF based Web Application
- Template based View in JSF Web Application
- Creating CRUD with AngularJS and JAX-RS web services in JAVAEE
- Form based Login Authentication in JavaEE7 with Wildfly and MySql
In the begenning we are presenting an overview of what we are going to do here. We have a web application backed by EJB+JPA, however this tutorial is not related to that, you can work it independently in your Web Application. We are working with MYSQL as DBMS software and using Wildfly Datasource to interact with it(To know how to create mysql datasource with wildfly follow this tutorial: MySql Datasource creation in Wildfly 8). Now we will perform Form based authentication using the database table at the backend. We will proceed in following steps:
- Create a security domain in Wildfly.
- Create security constraints in web.xml and configure it to use security domain.
- Create Login and Error Pages.
Creating Security Domain for Authorization and Authentication
We have already mentioned that we will be using a datasource created in earlier part of this series, once you have a datasource you can proceed to further steps. So now we are going to create a Security Domain. This can be done either using the text editor and editing the configuration file or by using the Administrator panel of wildfly. I am going to proceed in first way, by editing the configuration file.
We are using Wildfly 8.1 final, and running it in standalone mode, thus we have configuration file located on the path:
[wildfly-root]/standalone/configuration/standalone.xml
Open this file and search for the subsystem called “jboss:domain:security:x.y”(x.y) is the version number. This subsystem holds the security domains created in the system. Here we are going to create a new domain by the name of “school”, as in the example application we have been creating til now we are using the school scenario.
Use following code to create a new security-domain under this subsystem.
<security-domain name="school" cache-type="default"> <authentication> <login-module code="Database" flag="required"> <module-option name="dsJndiName" value="java:jboss/datasources/school"/> <module-option name="rolesQuery" value="SELECT role, 'Roles' FROM users WHERE username=?"/> <module-option name="hashAlgorithm" value="MD5"/> <module-option name="hashEncoding" value="hex"/> <module-option name="principalsQuery" value="SELECT password from users WHERE username=?"/> </login-module> </authentication> <authorization> <policy-module code="Database" flag="required"> <module-option name="dsJndiName" value="java:jboss/datasources/school"/> <module-option name="rolesQuery" value="SELECT role, 'Roles' FROM users WHERE username=?"/> <module-option name="hashAlgorithm" value="MD5"/> <module-option name="hashEncoding" value="hex"/> <module-option name="principalsQuery" value="SELECT password from users WHERE username=?"/> </policy-module> </authorization></security-domain>the database table we are using here is simple, following code is the result of “SHOW CREATE TABLE [table-name]” query for the table we are using.
CREATE TABLE `users` ( `id` int(11) NOT NULL AUTO_INCREMENT, `username` varchar(20) NOT NULL, `password` tinytext NOT NULL, `role` varchar(15) NOT NULL, PRIMARY KEY (`id`), UNIQUE KEY `usrname` (`username`) ) ENGINE=InnoDB AUTO_INCREMENT=3 DEFAULT CHARSET=latin1NOTE: The little problem to know here is that we are focusing on both Authentication and Authorization both modules. When we are working with security. Most of the tutorials on internet only focus on Authentication part and in result user faces problem even after everything is alright. So just out of precaution that everything should proceed all right we are taking in account both Authorization and Authentication. The hashCode and hashAlgorithm used in our demonstration is using MD5 make sure the password in your database is hashed using this algorithm or you configure the application according to your needs. To know how to use hashAlgorithm in Java read this article: Using Encryption Algorithm In Java.
NOTE: The queries written here are in the syntax of MySql queries, you should write the queries in the syntax of whichever DBMS you are using.
Now we are telling about various parameters we are using in the domain.
- security-domain: This comes under the subsystem security-domains tag. This is used to represent one single security domain. the parameter it takes is name and cache-type. In the cache-type we have two options default and infispan, we are going to leave it to default.
- Authentication and Authorization: These are two different modules one is used for Authentication process and one for Authorization process. These have further properties which we know as module-options. Now we use these options to define the working of these modules. However there are parameters use. code, which we set to Database in case we want to use database as our source of operation. and flag which tells if the code part is required or optional.
- dsJndiName: This is a module option which tells the system to use the datasource in order to connect to a database. We pass a datasource JNDI as a value in here.
- principalsQuery: This is the key query which matches the passed username and value against the database entries and returns true or false based on the result. The general structure of query is:
SELECT [password-column] FROM [table-name] WHERE [username-column]=? - rolesQuery: This is the query we are going to use in order to query the database for the role type of user. This is more of a authorization process. Here the general structure of query is:
SELECT [role-column], 'Roles' FROM [table-name] WHERE [username-column]=? - hashAlgorithm: This tells the system to use a perticular hashAlgorithm to match against the password. This is an optional step but is recommended to ensure the security of password.
- hashEncoding: This is also an optional step but is necessary if you are using hashAlgorithm, this tells the system to use a particular encoding for the hash code generated by the algorithm specified in hashAlgorithm.
Now our security domain is ready to use, just save the configuration file and restart the wildfly server. If you want to look how this configuration looks under the Administrator panel, follow these steps:
- Log in into admin panel.
- Go to configuration tab.
- Expand Subsystems > Security > Security Domains
- There will be a list of Security Domains available. Click on view for the domain you want to explore.
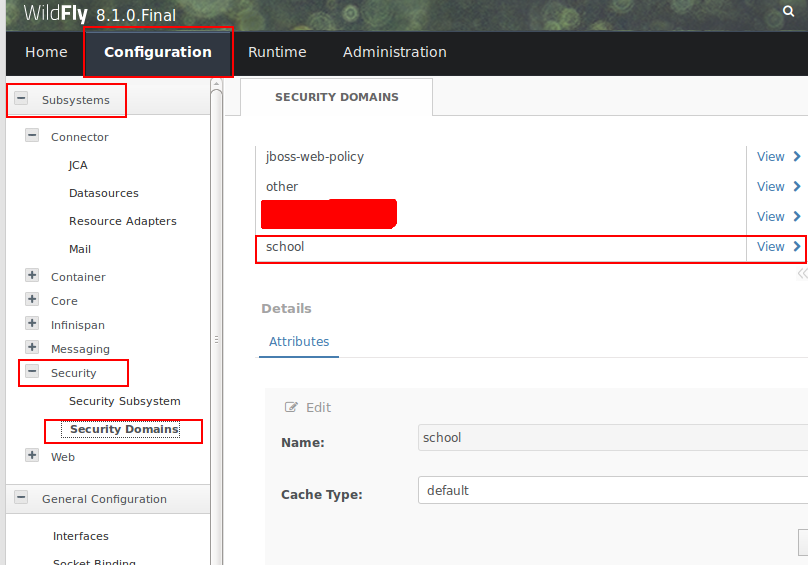
Creating and Configuring security constraints in web application
In your web application you need to configure the web.xml in order to use the security domain, this is a step by step process.
- Defining the security domain to be used in jboss-web.xml
- Define the security constraints.
- Define the type of Authentication process and configure it to use the security domain created in first step.
- Define the roles supported by the application.
First thing first, expand your web application and look for WEB-INF directory. In eclipse it is located at, ApplicationRoot > WebContent > WEB-INF. In this create an XML file called “jboss-web.xml” and specify the name of domain to be used.
<?xml version="1.0" encoding="UTF-8"?><jboss-web> <security-domain>school</security-domain></jboss-web>After that in the WEB-INF look for web.xml and open it for editing. We need to define security constraint, authentication mechanism and roles in there. The complete web.xml will look like this once we are done.
<?xml version="1.0" encoding="UTF-8"?><web-app xmlns:xsi="http://www.w3.org/2001/XMLSchema-instance" xmlns="http://xmlns.jcp.org/xml/ns/javaee" xsi:schemaLocation="http://xmlns.jcp.org/xml/ns/javaee http://xmlns.jcp.org/xml/ns/javaee/web-app_3_1.xsd" id="WebApp_ID" version="3.1">
  <display-name>DemoWeb</display-name>
  <welcome-file-list>    <welcome-file>/pages/index.xhtml</welcome-file>  </welcome-file-list>
  <servlet>    <servlet-name>Faces Servlet</servlet-name>    <servlet-class>javax.faces.webapp.FacesServlet</servlet-class>    <load-on-startup>1</load-on-startup>  </servlet>  <servlet-mapping>    <servlet-name>Faces Servlet</servlet-name>    <url-pattern>*.xhtml</url-pattern>  </servlet-mapping>
  <!--Defining security constraint for type of roles available-->  <security-constraint>    <web-resource-collection>      <web-resource-name>administrator</web-resource-name>      <url-pattern>/pages/admin/*</url-pattern>      <http-method>POST</http-method>      <http-method>GET</http-method>      <http-method>PUT</http-method>      <http-method>DELETE</http-method>    </web-resource-collection>    <auth-constraint>      <role-name>ADMINISTRATOR</role-name>    </auth-constraint>  </security-constraint>
  <security-constraint>    <web-resource-collection>      <web-resource-name>user</web-resource-name>      <url-pattern>/pages/user/*</url-pattern>      <http-method>POST</http-method>      <http-method>GET</http-method>      <http-method>PUT</http-method>      <http-method>DELETE</http-method>    </web-resource-collection>    <auth-constraint>      <role-name>ADMINISTRATOR</role-name>      <role-name>USER</role-name>    </auth-constraint>  </security-constraint>  <!--Defining security constraint for type of roles available-->
  <!--Defining type of authenitcation mechanism-->  <login-config>    <auth-method>FORM</auth-method>    <realm-name>school</realm-name>    <form-login-config>      <form-login-page>/login.xhtml</form-login-page>      <form-error-page>/error.xhtml</form-error-page>    </form-login-config>  </login-config>  <!--Defining type of authenitcation mechanism-->
  <!--Denining security role-->  <security-role>    <role-name>ADMINISTRATOR</role-name>  </security-role>
  <security-role>    <role-name>USER</role-name>  </security-role>  <!--Denining security role-->
</web-app>
In the code above we are going to focus on three sections, viz: security-constraint, login-config and security-role. The first part is to define the constraint and which type of role is allowed to access that part of application. We define it as follows:
Security Constraint
- security-constraint: The holder of a whole constraint.
- web-resource-collection: This part defines the set of web resources which comes under a particular type of constraint. By web resources we mean the web pages.
- web-resource-name: This tag is used to specify a name for a constraint.
- url-pattern: Used to specify the access URL pattern for the web pages that comes under the restrictions of this constraint.
- http-method: Specifies the allowed http method on the resources under the url pattern specified above.
- auth-constraint: To bind the role type with this security constraint.
- role-type: Used with auth-constraint to bind the role type.
Login Configuration
We are going to use the FORM based authentication thus, first a login form and error page is required. We have created the login.xhtml and error.xhtml in the WebContent directory. The key part of your login page is login form which is of following structure. And the error page, you can design to please yourself.
<form action="j_security_check" method="post" class="form-horizontal"> <div class="form-group"> <label class="control-label col-sm-2">Username:</label> <div class="col-sm-10"> <input type="text" class="" name="j_username" placeholder="Username" /> </div> </div> <div class="form-group"> <label class="control-label col-sm-2">Password:</label> <div class="col-sm-10"> <input type="password" class="" name="j_password" placeholder="Password" /> </div> </div> <div class="form-group"> <div class="col-sm-offset-2 col-sm-10"> <button type="submit" class="btn btn-primary">Login</button> </div> </div></form>**NOTE:**The name of this file need not to be login.xhtml or error.xhtml, you can use whatever name you like. The classes in the code above are bootstrap classes, if you want to learn the use of bootstrap with JSF try this article: Applying Bootstrap to JSF based Web Application And to learn to create the template based application in JSF read this article: Template based View in JSF Web Application.
Once you have login form and error page ready, you can use them in the login-config sections as shown in web.xml code above.
- login-config: To define the login mechanism.
- auth-method: To set the authentication method, we are using FORM.
- realm-name: The name of security domain we created and specified in jboss-web.xml.
- form-login-config: To specify the login configuration.
- form-login-page: url pattern to login page. User will be redirected to this page when trying to access a restrected url.
- form-error-page: url pattern to error page, user will be redirected to this page if the login credentials are not correct.
Defining Roles
- security-role: To specify the security role.
- role-name: To specify the name of role.
This is all now you shall be able to work out the application. Whenever a user will try to access the url which comes under a url pattern specified in security-constraint, the user will be prompted for the login to proceed.
Please leave your queries or correct us if we did something wrong somewhere.